Downgrade AWS Lightsail
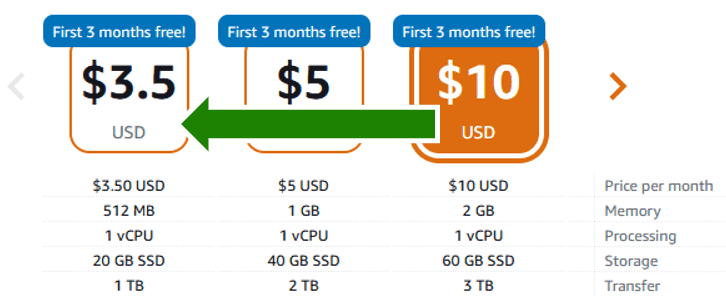
Lightsail instances are virtual private servers in the AWS Cloud. You have several performance options starting at $5 per month. If your application grows, and you need more memory, storage or compute, upgrading your instance is very easy. However, downgrading is not supported natively, because each Lightsail bundle ships with a fixed size SSD disk: moving to a cheaper plan also means moving to a smaller disk, not just less CPU and RAM.
This post describes a solution consisting of four main steps:
- Backup the old Lightsail instance.
- Create a new, smaller, Lightsail instance.
- Transfer the backup to the new Lightsail instance.
- Apply backup to new Lightsail instance.
Side note: before touching anything, take a manual snapshot of the source instance from the Lightsail console. It costs almost nothing, gives you a rollback point that doesn’t depend on the tar backup below working correctly, and you can delete it once the new instance is confirmed healthy.
1. Backup the source Lightsail instance
Before we start, it is good to know that older Lightsail instances had their /bitnami folder located at /home/bitnami. This post is based on Restore Application Backups from the Bitnami documentation, applied here to a Bitnami WordPress instance.
Go to AWS Lightsail portal and access your existing, larger Lightsail instance which we will call source. Connect to the source instance using SSH, for example using the ‘Connect using SSH’-button . The code block below provides you with the commands to execute the following steps: First, create a directory in which you wish to save your backup, backup_bitnami. Stop all servers. Create a compressed file with the directory containing application data files. Additionally, to make a full backup, create a compressed file with the directory containing application binaries and runtime files. You can then restart the server to reduce downtime. For newer Lightsail instances, your bitnami folder may be located in /bitnami instead of /home/bitnami:
bitnami@ip-3.66.183.48:~$cd /home/
sudo mkdir backup_bitnami
sudo chown bitnami:bitnami backup_bitnami
cd backup_bitnami/
sudo /opt/bitnami/ctlscript.sh stop
sudo tar -pczvf application-backup.tar.gz /bitnami
sudo tar -pczvf application-bin.tar.gz /opt/bitnami
sudo /opt/bitnami/ctlscript.sh start
2. Create a new target Lightsail instance
Before picking a bundle, check how much disk the source instance is actually using with df -h /. Each Lightsail bundle comes with a fixed SSD size, so a bundle that is cheaper on CPU and RAM can also mean a smaller disk. If your current usage doesn’t comfortably fit on the target bundle’s disk, the restore in step 4 will run out of space partway through, after you have already stopped the new instance’s servers. Pick a bundle whose disk size clears your current usage with headroom to spare.
Back in the AWS Lightsail portal, create a new smaller Lightsail instance which we will call target. Connect through SSH and again create the new directory on the target instance with mkdir /home/backup_bitnami.
3. Transfer the backup
In this section I will describe two ways to transfer the backup files from your source instance to the target instance.
a. The first approach leverages the Secure File Copy scp command which comes natively with all operating systems except for Windows before 10.
b. The second approach requires the installation of a client like WinSCP or Filezilla that offers a graphical user interface. This approach is preferable if you are planning on transferring files to or from your instances more frequently.
In both cases, you need to note the IP addresses of both Lightsail instances and the default SSH key. The IP address of a Lightsail instance can be found on its page in the top panel and can either be ‘Static IP address’ or ‘Public IPv4 address’. The SSH key is the same for both instances and can be downloaded by clicking the ‘Download default key’ link further down one of the pages. For example:
# Source (Larger Lightsail Instance)
3.66.183.48
# Target (Smaller Lightsail Instance)
3.71.19.47
# Key file
LightsailDefaultKey-eu-central-1.pem
3.a From the command line
We will first transfer the key file for the target instance to the source instance so that we can move our backups from source to target.
First, open a terminal window and navigate to wherever the key files were downloaded to. Then, we need to restrict the permissions of the key file, or SSH won’t let us use them. Then, we can transfer the key file to the source. From this terminal window, you can SSH straight into your source and move the backups to the target instance.
user@local:~/downloads$
chmod 600 'LightsailDefaultKey-eu-central-1.pem'
scp -i 'LightsailDefaultKey-eu-central-1.pem' \
       'LightsailDefaultKey-eu-central-1.pem' \
       bitnami@3.66.183.48:/home/backup_bitnami
ssh -i "LightsailDefaultKey-eu-central-1.pem" bitnami@3.66.183.48 "\
    scp -i '/home/backup_bitnami/LightsailDefaultKey-eu-central-1.pem' \
           '/home/backup_bitnami/application-backup.tar.gz' \
           bitnami@3.71.19.47:'/home/backup_bitnami' & \
    scp -i '/home/backup_bitnami/LightsailDefaultKey-eu-central-1.pem' \
           '/home/backup_bitnami/application-bin.tar.gz' \
           bitnami@3.71.19.47:'/home/backup_bitnami' &"
Side note: the command above copies your private key onto the source instance so it can relay the backup to the target. Once the transfer finishes, SSH back into the source instance and delete that copied key file (rm /home/backup_bitnami/LightsailDefaultKey-eu-central-1.pem), so you’re not leaving a private key sitting on a remote server.
3.b With a client
Using a client such as WinSCP or FileZilla offers a graphical user interface and easier organization of connections. This section is focussed on using WinSCP. WinSCP is only available for Windows. For Mac please see the AWS Docs on FileZilla.
In WinSCP, we start with adding the old and new Lightsail instances to saved sessions. In the login screen that is prompted upon startup, or can be found under the menu line at the top of the screen by double clicking ‘New Tab’, perform the following steps:
- File protocol: SFTP
- Host name: (public IP, for example,
3.66.183.48) - Port number:
22 - User name:
bitnami -
- SSH → Authentication → Private key file → on Windows select to show all file types (.) → upload the
.pemfile. WinSCP will ask you if you want it converted to a PuTTY Private key file (.ppk), click OK. Save the.ppkfile, and select it as Private key file.
- SSH → Authentication → Private key file → on Windows select to show all file types (.) → upload the
- and give the site a name.
On the old instance, use WinSCP to navigate to /home/backup_bitnami. Download the application-backup.tar.gz and application-bin.tar.gz to your local machine.
Then, still in WinSCP, switch to the new instance and transfer the application-backup and application-bin to the backup_bitnami folder.
4. Restore backup
Side note: this assumes the target instance’s Bitnami WordPress stack is the same version as the source’s. Bitnami has repeatedly changed how its Lightsail blueprints are packaged since this post was written, and stopped free updates to many of its legacy VM images in 2025, so a target instance created today can easily ship a different PHP, Apache or MySQL version than an older source. Restoring application-bin.tar.gz overwrites the entire /opt/bitnami binary tree, and if the versions differ that can leave the stack broken rather than just downsized. If you’re not sure the versions match, skip the binary restore below, keep the target’s own /opt/bitnami, and restore only application-backup.tar.gz (your WordPress files and database) onto it, reapplying any custom Apache config by hand.
Connect to the new Lightsail instance using SSH . Here we will do the following: 1) Navigate to the directory containing your backup. 2) Stop all servers. 3) Move the current stack to a different location. 4) Uncompress the backup file with the application data files to the original directory. 5) Additionally, to restore a full backup, uncompress the backup file with the application binaries and runtime files to the original directory. 6) Then finally, start all servers:
bitnami@ip-3.71.19.47:~$cd /home/backup_bitnami
sudo /opt/bitnami/ctlscript.sh stop
sudo mv /opt/bitnami /tmp/bitnami-backup
sudo tar -pxzvf application-backup.tar.gz -C /
sudo tar -pxzvf application-bin.tar.gz -C /
sudo /opt/bitnami/ctlscript.sh start
Before doing anything else, verify the migration worked: run sudo /opt/bitnami/ctlscript.sh status to confirm Apache and MySQL both report as running, then load the site in a browser using the target’s own IP address (not the domain yet, since the static IP hasn’t moved). Only proceed once that looks healthy.
Clean up after yourself
In the online Lightsail portal , detach the static IP address from the old instance, then attach that same static IP to the new instance, so your domain keeps resolving to the same address without a DNS change. Then stop the old instance.
NB: Do not delete the old Lightsail instance before you have verified that the new Lightsail instance works. It is best to just give it some time. Then, delete the instance permanently.
If you run into any issues with your website being unresponsive, please make sure all servers are up and running. (last step of part 4) If you can still not get things working, you can always redeploy the backup you saved to a safe location by starting at step 4.
Comments